What to Know About Installing Modern Pergolas Outdoors
A well-planned outdoor structure can turn a plain slab into a place that feels useful from early coffee to late evening meals. That is why a modern pergola patio has become such a practical upgrade for homeowners who want shade, style, and clearer zones for relaxing or entertaining. Installation, however, involves more than picking a frame, because layout, footing depth, drainage, materials, and code compliance all affect long-term results. This guide breaks the process into manageable parts so you can plan confidently and avoid expensive missteps.
Outline
- How to assess your site, goals, and local requirements before installation
- Which materials and design options suit different climates, budgets, and aesthetics
- What a solid installation involves, from layout and footings to anchoring and utilities
- How to make the space more comfortable, attractive, and functional year-round
- What to expect on cost, upkeep, and long-term value as a homeowner
1. Planning the Space Before You Build
The planning stage is where most successful outdoor projects quietly win. Before comparing finishes or scrolling through inspiration photos, it helps to decide what you want the structure to do. Some homeowners want filtered shade above a dining table. Others need a more flexible outdoor room for reading, working, or hosting friends. The answer changes the ideal size, placement, roof style, and even the direction of the beams overhead. A pergola patio that looks beautiful in a showroom can feel awkward in a real backyard if it ignores afternoon sun, neighboring windows, or the path people naturally take from the house to the garden.
Start with the site itself. Measure the patio and the nearby clearances carefully. You need enough room not just for the frame, but also for movement around furniture, grill zones, planters, and doors. On many patios, leaving at least 30 to 36 inches for circulation makes the space feel usable rather than cramped. Sun exposure matters just as much. A west-facing area may be comfortable in the morning but quite hot by late afternoon, which is why slats, louvers, retractable canopies, or side screens deserve attention early in the process. Wind can also shape the experience. In an exposed yard, a stylish open-top structure may need privacy panels or landscaping to prevent it from becoming a breezy corridor.
Drainage is another overlooked issue. If water already pools near the slab, installing posts and decorative elements without correcting the slope can lock in future problems. Water that collects around post bases, foundations, or pavers often shortens the life of the installation and increases maintenance. That is why professionals usually inspect the grade, check downspout locations, and confirm that runoff moves away from the house.
- Measure the footprint of the patio and the surrounding clearance
- Track sun and shade patterns at different times of day
- Check setback rules, permits, and HOA requirements if they apply
- Identify drainage issues before any concrete or anchoring work begins
- Decide whether the pergola will be freestanding or attached to the home
Finally, review local building rules. In many areas, footing depth must extend below the frost line, and attached structures may require more documentation than freestanding kits. A little paperwork is not glamorous, but it is far less annoying than redoing work after an inspection. Think of planning as the quiet architecture of comfort: when it is done well, the finished space feels effortless.
2. Choosing Materials and a Modern Design That Fits
Once the layout is clear, material selection becomes the heart of the project. This is where style and practicality meet, and occasionally argue. Wood remains popular because it offers warmth, texture, and a timeless look that suits both traditional homes and modern landscapes. Cedar and redwood are commonly chosen for their natural resistance to decay and insects, though they still need maintenance over time. Pressure-treated lumber costs less upfront, but many homeowners eventually spend extra time and money staining, sealing, or replacing warped boards. If you like the honest character of wood and do not mind upkeep every few years, it can be a rewarding choice.
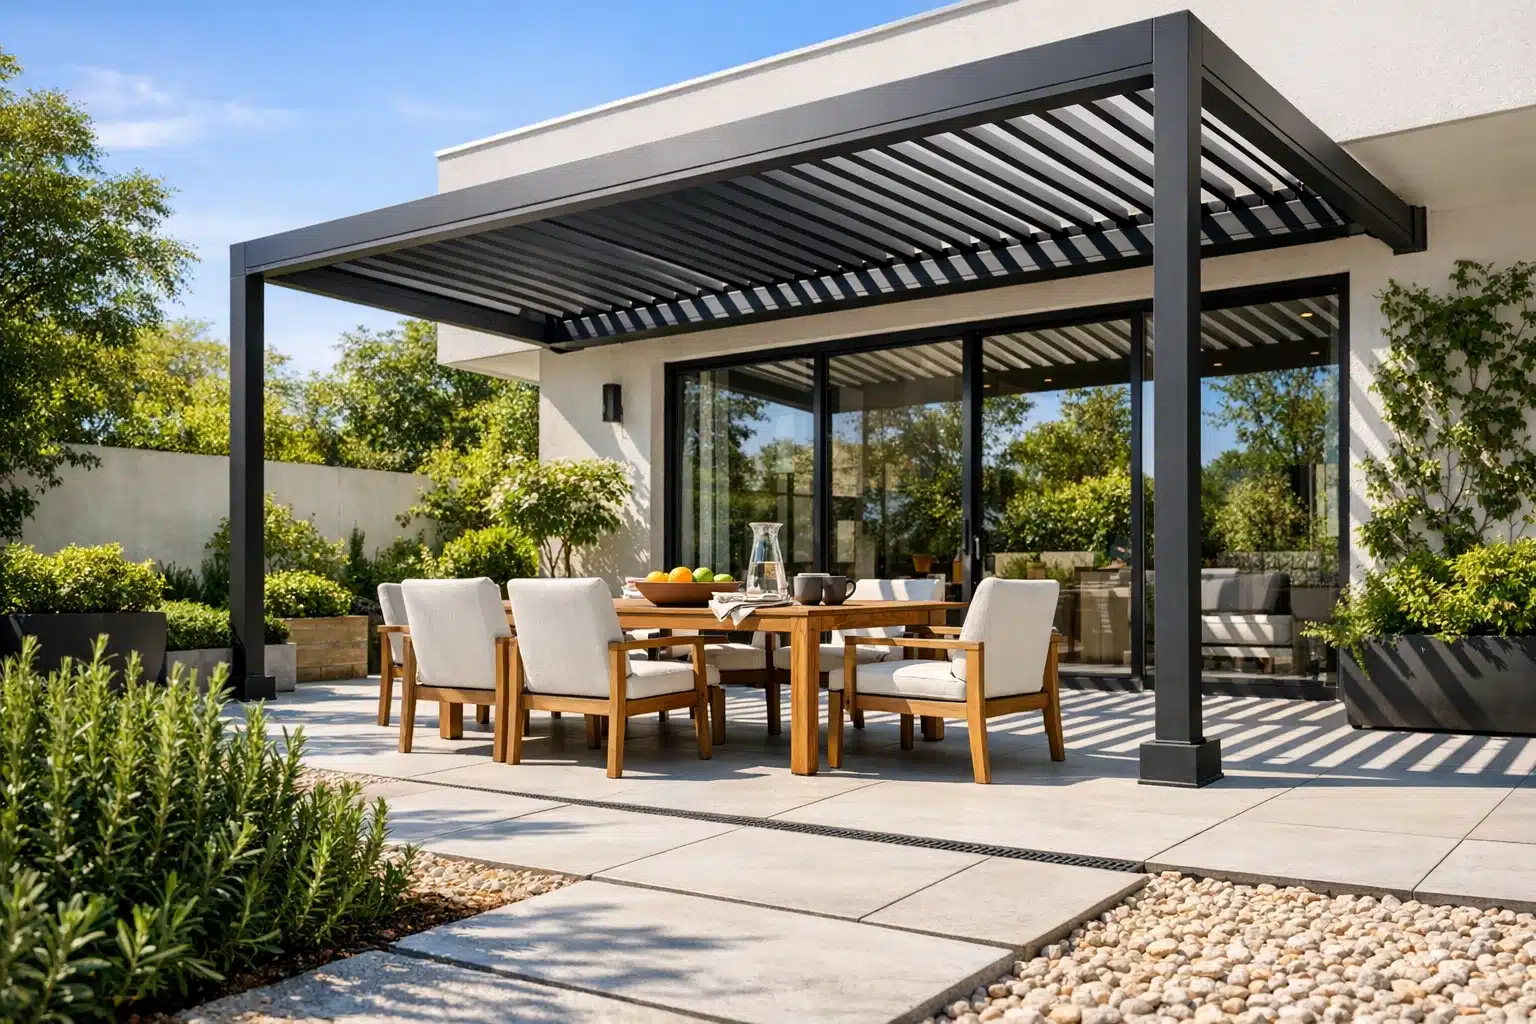
Aluminum has gained major attention in modern outdoor design for good reason. It is lightweight, resistant to rot, and usually requires far less maintenance than wood. Powder-coated finishes can deliver a crisp, contemporary appearance, especially in black, charcoal, bronze, or soft white. For homeowners who want clean lines and fewer seasonal chores, an aluminum pergola patio often makes practical sense. Steel offers impressive strength and a sleek profile, but it may need more protection in coastal or high-moisture climates. Vinyl is sometimes selected for its low maintenance, though design-minded buyers may find that it lacks the visual depth of wood or metal.
Roof style also matters. A classic pergola uses open slats, which create dappled shade and a light, airy look. That is lovely in mild climates, but it will not fully block rain or harsh summer exposure. Louvered systems give more control because the blades can tilt to manage sunlight and ventilation. Some high-end versions are motorized and can close during rain. Covered pergolas with polycarbonate or insulated panels provide stronger weather protection, though they also change the structure from breezy frame to more defined shelter.
Modern design tends to favor restraint. Instead of ornate details, many current builds use square posts, slimmer beams, integrated lighting, and a controlled color palette. The goal is not emptiness; it is clarity. A few thoughtful decisions usually outperform a crowded mix of materials.
- Choose wood for natural warmth and a classic architectural feel
- Choose aluminum for lower maintenance and modern clean lines
- Use louvers or canopies when flexible shade matters
- Match the pergola scale to the house so it feels intentional, not oversized
- Coordinate finishes with doors, windows, railings, or outdoor furniture
The best material is rarely the trendiest one. It is the one that suits your climate, maintenance tolerance, design goals, and budget without asking the impossible from your future weekends.
3. Installation Basics: Footings, Anchoring, Utilities, and Safety
Even the most attractive design depends on sound installation. A pergola is not just outdoor decor; it is a structural element that must resist wind, moisture, seasonal movement, and years of daily use. This is why the technical side deserves respect. On a small residential project, the framework may look simple, but the load path still matters. Weight and lateral forces need to travel safely from beams to posts to footings or engineered anchors. If that chain is weak, problems appear gradually as lean, sway, cracks, or fastener failure.
The first major decision is whether the structure will be freestanding or attached. Freestanding pergolas offer flexibility in placement and often simplify waterproofing because they are independent of the home’s wall assembly. Attached units can create a seamless transition from indoors to outdoors, but they require careful flashing, structural connection, and code review. No one wants an outdoor upgrade that quietly introduces water intrusion to the house.
Footings are the foundation of the whole project. In many climates, they need to extend below the frost line to reduce movement caused by freezing and thawing. Exact depths vary by region, so local code and site conditions should guide the plan. Post bases also matter. Elevated metal brackets can help keep wood posts off wet concrete, which reduces moisture exposure over time. If the pergola is being installed on an existing slab, the slab itself must be evaluated. Not every patio is thick or reinforced enough for structural anchoring, and that is one reason some builds require new footings cut into the slab.
Electrical planning should happen before finishes go in. If you want lighting, a ceiling fan, infrared heaters, outdoor speakers, or motorized louvers, the wiring path needs to be coordinated early. Retrofitting after the fact is usually messier and more expensive. The same goes for drainage, privacy screens, and any nearby kitchen or grill setup.
- Confirm permits, engineering requirements, and inspections before starting
- Mark utility lines and verify safe digging locations
- Lay out post positions carefully and square the frame precisely
- Use hardware rated for exterior exposure and local weather conditions
- Plan electrical and lighting routes before the final trim and finishes
A professionally installed pergola patio often costs more upfront than a quick kit assembled over a weekend, but the difference usually shows up in alignment, durability, and peace of mind. Good installation is mostly invisible, and that is exactly the point. The frame should feel calm, steady, and unsurprising, even when the weather is not.
4. Making the Outdoor Room Comfortable and Beautiful
Installation creates the structure, but livability gives it a reason to exist. A pergola that only photographs well is not enough. The most satisfying outdoor spaces feel inviting on an ordinary Tuesday, not just during a summer party. That means thinking about shade, airflow, seating, lighting, privacy, and seasonal use as a connected system rather than a collection of accessories. In practice, comfort often comes from layering small decisions that work together.
Shade is usually the first concern. Open rafters create a pleasant play of light, but in stronger climates they may need help. Retractable canopies, sliding shade panels, climbing plants, or side screens can make the difference between a decorative feature and a place people actually use at midday. Vines can be beautiful, though they also add weight, maintenance, and moisture considerations, so the structure should be designed to support them. Fabric elements soften the geometry of a modern frame, while slatted privacy walls help shield views from neighboring homes without closing the space completely.
Furniture should fit the scale of the pergola and the way you live. A dining setup needs room for chairs to move freely. A lounge layout benefits from lower seating, side tables, and perhaps an outdoor rug to define the area. Modular seating works well when the patio serves different purposes throughout the week. If the structure is near a kitchen door, it often becomes a natural extension of the home, especially when lighting and materials feel coordinated. This is where a pergola patio begins to read less like an add-on and more like an outdoor room with its own identity.
Lighting deserves special attention. Overhead string lights create atmosphere, but layered lighting is more useful. Recessed fixtures, wall sconces, step lights, and dimmable accents make the area safer and more flexible. In warmer regions, a ceiling fan can improve comfort dramatically. In cooler ones, radiant heaters can extend the season without changing the look of the structure too much.
- Use layered lighting for both mood and visibility
- Choose weather-resistant fabrics and quick-dry cushions
- Add planters, screens, or slatted panels for privacy
- Consider a fan, heater, or misting system based on climate
- Keep circulation clear so the room feels open and easy to use
Done well, the space begins to act like a stage set for everyday life: breakfast in soft light, work calls with fresh air, dinner under a glow that makes even plain takeout feel a little ceremonial. Good design does not shout. It quietly improves the hours spent outside.
5. Final Thoughts for Homeowners Planning an Outdoor Upgrade
For homeowners weighing whether to build now, wait, or simplify the idea, the smartest approach is to think beyond the first day of installation. Cost matters, of course, but long-term value depends on fit. A smaller, well-placed structure with reliable materials often performs better than an oversized build that strains the budget and the space. In broad terms, prefabricated kits tend to be more affordable than custom designs, while motorized louvered systems, integrated lighting, and premium finishes push costs upward. Labor, permits, concrete work, and electrical upgrades can also change the budget more than many people expect. That is why comparing quotes line by line matters; the lowest number is not always the most complete proposal.
Maintenance should be part of the decision from the start. Wood may need sealing or staining every few years depending on climate and exposure. Fasteners should be checked periodically, especially in windy regions or areas with freeze-thaw cycles. Leaves and debris should not be allowed to sit in drainage channels, on covers, or around post bases. Metal systems need less routine care, but they still benefit from cleaning, inspection, and touch-up if coatings are scratched. The goal is not constant upkeep. It is steady attention that prevents small issues from becoming expensive repairs.
For many readers, the right question is not simply, “Should I install one?” but “What kind of outdoor life am I trying to support?” If your answer includes family meals, quieter mornings, better shade, or a more finished backyard, a pergola patio can be a practical and attractive investment. It adds definition without fully enclosing the yard, and it can improve daily use of outdoor square footage in a way that feels immediate. That is especially valuable when homeowners want more function without committing to a large addition.
Before signing a contract or opening a tool bag, take time to do three things well:
- Match the design to your climate, your house, and your actual routines
- Choose materials based on lifespan and maintenance, not just first impressions
- Respect structural details, permits, and drainage as much as appearance
If you do that, the result is more than a fashionable backyard feature. It becomes a durable setting for ordinary days and special evenings alike, and that is usually where the real value lives.